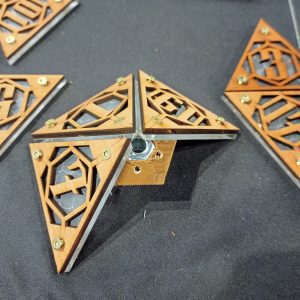
DLIGHT - LED Dice Shaped Lights
Roll for initiative colour!
Our DLIGHT dice lamps are the perfect addition to your DND area. Add some atmosphere with the RGB colour changing LED and remote control. Set the scene and tone using the array of options the remote provides.

Building Instructions
- 1. Arrange all components into piles
- Separate acrylic out into 1 pile of acrylic triangles with an angled corner (5) and the rest in another pile (Fig 1)
- DO NOT REMOVE film from the acrylic if you want the frosted effect
- Separate acrylic out into 1 pile of acrylic triangles with an angled corner (5) and the rest in another pile (Fig 1)
- 1. Arrange all components into piles

2. Locate wooden tiles 1,7,17,3,19 (Fig 2)

3. Arrange them in a pentagon shape, take the angled corner acrylic and place them on top of the wooden tiles with the angled corner sloping down to the center. (Fig 3)

4. Now prep all the faces for assembly, pair up a wooden face and an acrylic face, with the wood on top
- If using an electric screwdriver ensure it is on the lowest torque setting, or if using the Allen key insert 3 screws into every wooden face until it is flush with the acrylic, until all 20 tiles have 3 screws in them ( the acrylic is still loose at this time. (Fig 4)


5. Now take the LED bracket, with the threaded nut in, and screw in 3 panels 7,1,19 to this bracket making sure the screws become flush with the surface of the wood. (Fig 5)

6. Now assemble the LED bulb by pressing the frosted dome into its socket on the lamp (Fig 6)
7. Thread the wire of the bulb through the LED bracket, do this from the acrylic side so the connector is on the outside like the wood panels
8. Screw the bulb into the bracket using the thread on the underside of the bulb, until it is tight.

9. Screw the other 2 panels to the bracket so now you have a completed lower section of the dice (Fig 7)

10. Now attach a bracket to each corner section of your dice (Fig 8)

11. Attach panels 1-13, 7-15, 17-10, 3-16, 19-9
12. Screw those panels to the corresponding brackets, now you should have half a dice formed (Fig 9)

13. Repeat steps 2-12 replacing the numbers tiles with the following 20, 2, 18, 4, 14 again (using an ordinary bracket) until you have a second half of a dice formed (Fig 10)
- Starting at panel 20, with the other 4 panels, 2, 18, 4, 14
- After building the second base pair each panel in the following way (20-8, 2-12, 18-5, 4-11, 14-6)
- Put both halves together lining up 2, 12, 10 and screw them in until secure

14. Now you have a completed D20 Light (Fig 11)

15. Connect the USB lead to the connection coming from your D20
16. Plug into a power supply and test your light using the remote, after removing the plastic film and tab from the remote
17. Have a Dlight-ful time!

Lorem ipsum dolor sit amet, consectetur adipiscing elit. Ut elit tellus, luctus nec ullamcorper mattis, pulvinar dapibus leo.
